Quick Links:
Zen
and Art Home Disclaimer
Errata
Parts and Parts
Vendors
Truck Sales Service
and Repairs
Engine Fuel Hydraulics Radiator and Cooling
Air System Brakes Wheels Tires Electrical
and Batteries
Transmission Clutch
Axles Hubs Body Air
Conditioning
Tools
Safety
Brakes
The 1300L has disk brakes on all four wheels, with dual calipers on the front axle and single calipers on the rear axle. There are 3 brake circuits. First is the parking brake which is deactivated via air pressure. More correctly, it is activated by the lack of air pressure. The second circuit is air over hydraulic and the circuit plumbing goes to all four wheels. The third circuit serves only the extra pair of calipers on the front axle.
The parking brakes are engaged by releasing the air pressure in the lines to the parking brakes via the parking brake lever. The parking brakes have large cans with strong springs that are held at bay by normal air pressure. On my truck, when the "low air pressure" indicator light comes on at 7 bar, the parking brakes will come on quickly thereafter. This is a safety measure to insure that you never get a runaway vehicle.
The service brakes are actuated via the brake pedal and the brake modulator on the firewall is controlled via the pedal. The modulator then sends pressure to the brake master cylinder which actuates both hydraulic circuits in synchrony. The primary circuit (all four wheels) is split front-rear and the rear circuit goes through a load modulator that adjusts the delivered pressure to the rear axle based on how much the springs are being compressed. There is a rod that connects the rear torque tube to the modulator and the position of the torque tube (grossly mirroring the load on the truck) then changes the amount of braking delivered.
Both sets of front calipers are identical and are
discussed individually later in this section. When you
order brake parts, be sure that your parts supplier knows what
your problem is so he can insure that you have the correct
parts. A pad change requires only pads. Servicing
the dust boots or the piston requires a different kit. If
you have to separate the caliper halves, then you need the
special bolts and the o-ring. A full service will require
all of these components on the front and the rear has a separate
more extensive kit.
The most common brake maintenance action SHOULD be to change the brake fluid. You should do this once per year or more frequently if you operate your rig in water. The mog takes DOT 3 or DOT 4 fluid and this fluid is glycol based. It absorbs moisture from the air and the water will accumulate and cause rust in the cylinders in the caliper. I am not going to describe the full process, but provide a summary. In essence, you keep the brake reservoirs full of fluid and then perform repeated "depress brake pedal, open bleeder port to let fluid out, close port, release pedal". This process is common to all vehicles with hydraulic brakes and requires (at least) 2 people: one to press pedal, one to bleed and ideally one to keep reservoirs full. You must do this for each caliper: 4 on the front axle, 2 on the rear. An alternate, and easier method is to purchase a power bleeder. These can be found on the net and will allow a single person to perform the action.
The old brake fluid should be captured in a vessel (like an old water bottle) for inspection and disposal. If the fluid that comes out is clear, you are good to go. If it is dark or discolored, you need to continue to bleed until each portion of each circuit produces clear fluid. The dark discoloration is the result of water and heat damage to the fluid.
Aside from the rust damage that will result from having water in the brake fluid, the presence of water lowers the boiling point of the brake fluid. If you heat the fluid enough it will boil. My rig did not have an exhaust brake and on a number of occasions, we boiled the fluid out of the reservoirs due to heat generated from downhill braking. This was, as you might expect, distressing since we had no brakes at all. But the worst part was that in each case we were in a sufficiently low gear that not much braking effort should have been required. The culprit was not that we were using the brakes too much but rather that we had not changed the brake fluid frequently enough.
A less common thing to consider are the flex lines
for the brakes. These are rubber and have a life of about
15 years, 20 at the most. There are 7 lines total: 2
each wheel on the front axle, 2 on front torque tube, one on the
rear torque tube. They are easy to change and once
changed, it should last for another 15 years.
The next most common maintenance action is to change the brake pads. These pads are common with the Mercedes 300 series sedans and you can use the sedan pads if you cannot get mog pads. The pads ARE DIFFERENT in composition in that the sedan pads are not as robust and will erode faster. But, they can be used if you are down to the metal and cannot obtain mog-specific parts. To change the brake pads, block the wheels of the truck and jack up a corner of the truck until the wheels are off the ground and remove the tire. Mog tires are big and the trick to getting them off the hub is to use a regular round point shovel as the lever to lift them off.
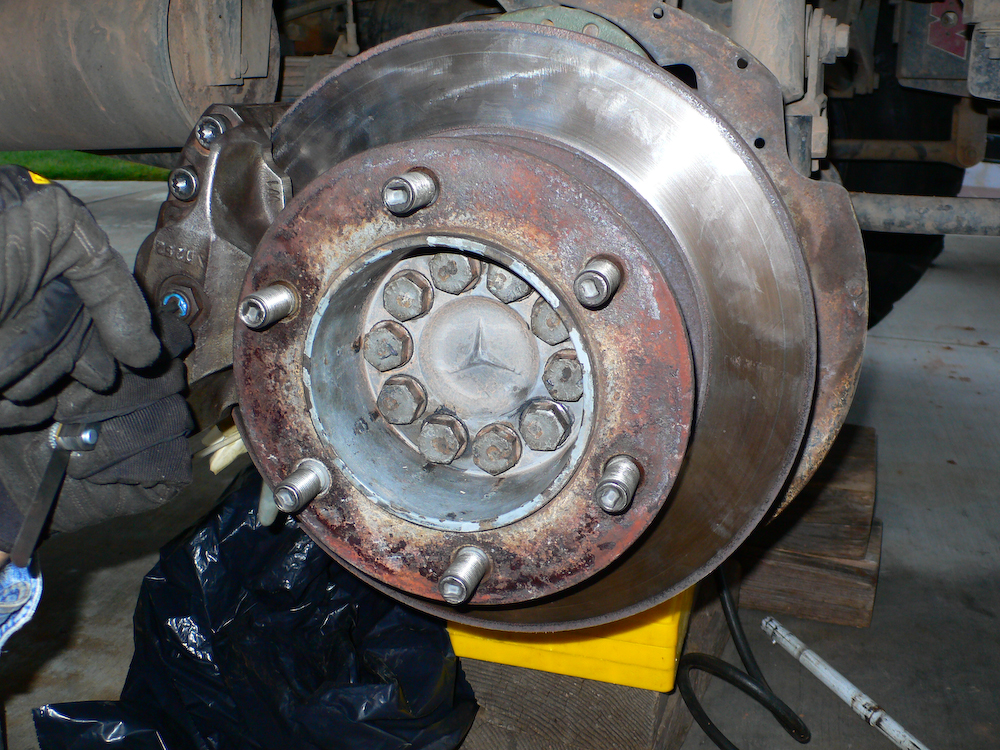
When you get the tire off, this is what you will see. This photo is of the rear; the front will have dual calipers at about 10 o'clock and 2 o'clock positions. As a side note, to remove the rotor, the inner 10 bolts need to be removed. These are special bolts and will be tight, so you will need a hardened socket and breaker bar (and likely a cheater as well).

This has happened to us a number of times. Like before, I broke sockets. This time, I broke 2 hardened impact sockets and a 1/2 breaker bar before I got the hub off. In the far left of the photo you can see that after the first broken bar, I bought a 3/4" breaker, extension and thin-walled 21-point socket. That one works fine.
If you have to remove the rotor, I suggest using
a hydraulic jack under the rotor to hold it while you undo the
10 bolts. This keeps it from falling on your toes and
trust me you don't want that to happen. Once the bolts
are loose, you may have to tap the rotor to get it off and
separated from the wheel flange. On reassembly, the
using the jack allows easy and precise height alignment
without too much bloodshed. If you have to remove a rotor, the
easiest way to do that is to insure that there is full air
pressure in the air tank and engage the differential
lock. This prevents the axle from turning thus allowing
you to put full torque into the hub bolts.
At this point you can inspect the state of the
pads. On most trucks there is a spring steel shield over
the brake pad access. Take a screwdriver and remove the
shield. When the shield is removed, you will see what is
shown in the photo below (but way dirtier). You can use spray
brake cleaner to removed the dust. You should be wearing
a mask when you do this as the dust is not good for you.
Brake cleaner can be obtained at your local auto parts
store. Once they are sufficiently clean to do an
inspection, you can easily see how much pad remains. If
they are thin, you need to replace them. Also, you
should be looking for signs of brake fluid leakage. If
you see leakage, then you will have to remove the pistons and
inspect the cylinder bore. This action will require
removing the caliper assembly from the hub.
A view of the rear caliper from above. Visible is the
pad retaining spring and pads. Also visible is the
parking brake actuator arm and the bleed valve.
To remove the pads, take a small punch and hammer and drive out the retaining pins. Remove the pins and the spring. Then using a straight blade screwdriver, pry the pads back from the rotor slowly. This process pushes brake fluid from the piston back to the reservoir so you have to hold steady pressure on it as the fluid flows back. If the reservoirs were full when you started this process, they will overflow, so either put a pan underneath to catch the drip or use a turkey baster to suck out some of the fluid to make room.
It should be noted that brake fluid is toxic to
mammals. To dogs and cats it tastes sweet and they will
try to drink it with fatal results, so properly dispose of any
spillage. Put old fluid in a used water bottle and place
it in the trash.
Once the pads have been moved back enough, you can remove them by easing them out of the housing. Sometimes they are stuck and you have to put a small punch in the hole and pry them out. Mercedes has a special tool that is a slide hammer with pins to match the holes in the pad. If you cannot get the pads out, then the whole caliper assembly has to come off OR you have to remove the rotor. Neither of these two actions are simple, so I suggest you put best efforts into getting the pads out in the current configuration.
Once the pads are out, you can inspect the front
of the brake pistons. The rotor is in the way, of
course, but you will likely be able to see enough to do the
job.
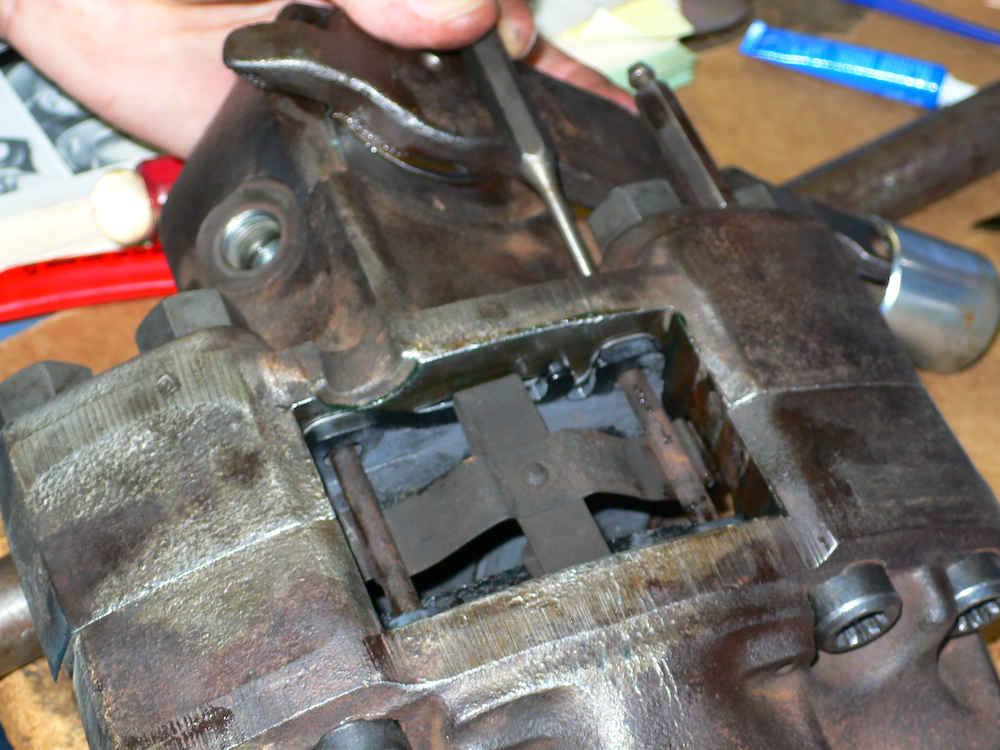
In the photo above, the rotor has been removed. In many cases you can do what you need to do without removing the rotor. Visible in the photo is the inboard brake piston, dust boot and the two bolts that hold the caliper to the hub assembly. If the dust boot is damaged, you should strongly consider servicing the piston which will require removing the caliper assembly from the hub which is not an easy job. In the photo above, the dust boot is damaged due to excessive heat and needs to be replaced.
I am basically lazy and will not remove the caliper assembly unless absolutely necessary. It is possible to replace the dust boots without removing the assembly, but it is hard. It is easier to service the pistons when the caliper assembly halves are separated, but you can do it without that action. Remember, if you separate the halves, you need to replace the bolts as they stretch during tightening and reusing them may result in the caliper assembly failing due to broken bolts. If that happens, you will have reduced braking ability, if any braking at all.
Rear Brakes
The rear calipers are different and have
additional mechanisms for the parking brake system. The
parking brake is actuated by pulling a lever. This lever
rotates a cam inside the caliper that forces the pads against
the rotor without any additional hydraulic pressure. The
parking brake design is quite complex, but seemingly
reliable. However, since my rig was almost 30 years old,
things started to fail. In general, at that age,
everything rubber is suspect. Seals, gaskets, hoses,
belts, etc. On the parking brake, the seal that failed was
the one that was the hardest to get to (of course). There
is a full web page dedicated to this specific repair and it can
be found at http://www.billcaid.com/2008/UnimogBrakeRepair20081110/UnimogBrakeRepair20081110.htm
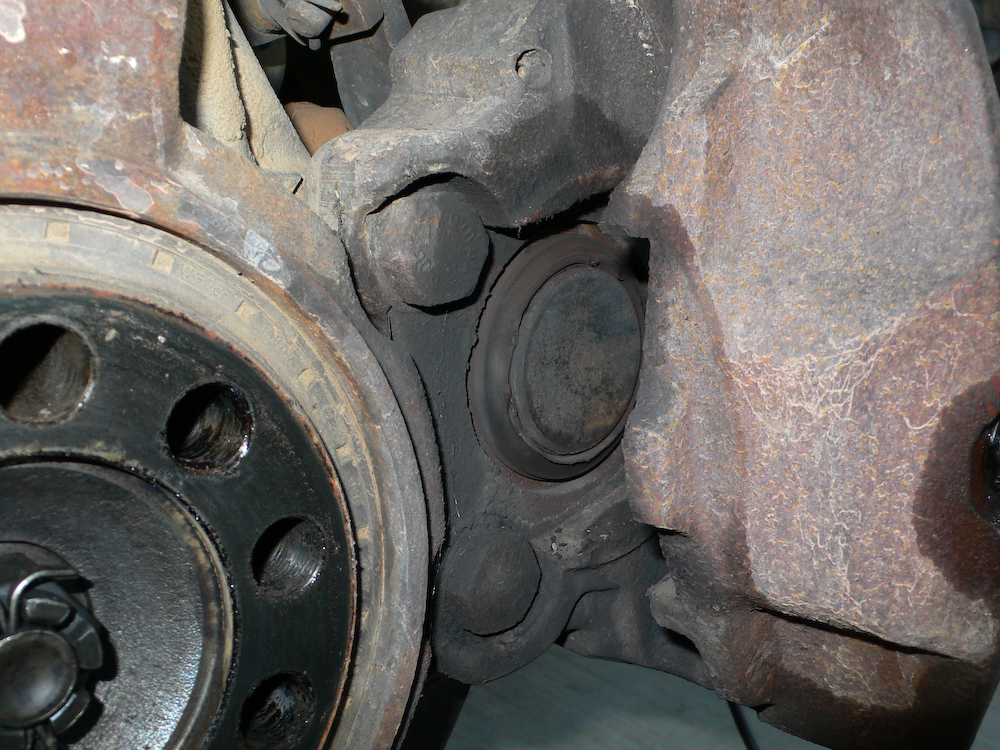
What I saw is shown in the photo above.
The leak is the seal that is underneath the actuator lever for
the parking brake. Note the bleeder port visible at the
top right of the photo above.
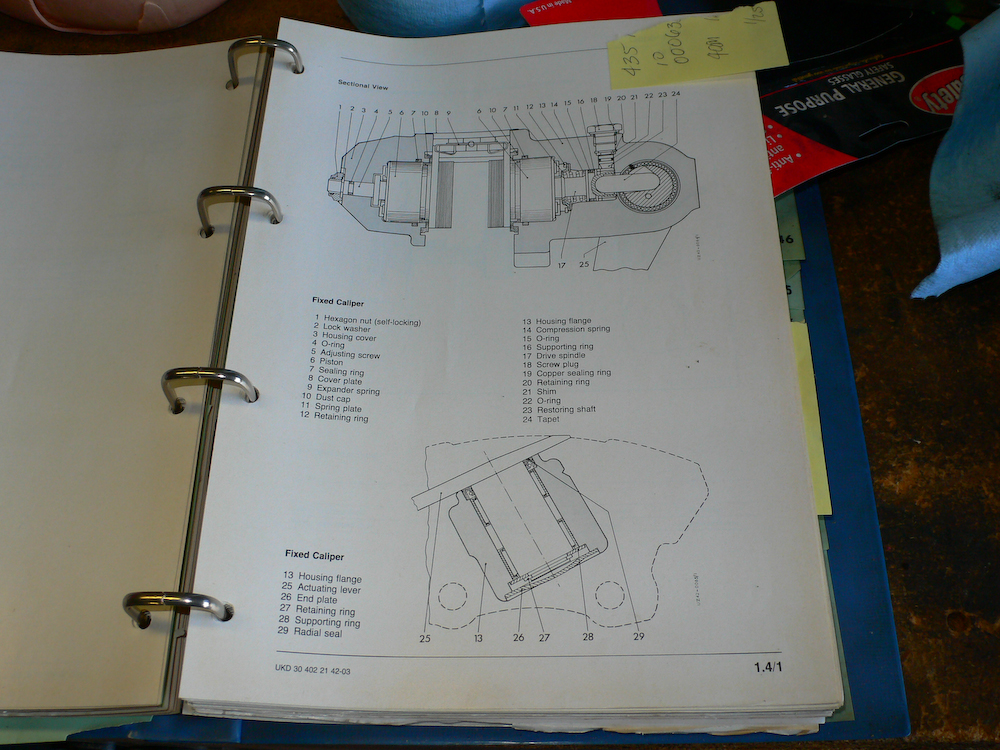
This is a photo of the relevant shop manual page. The assembly is quite complex; part number 29 is the seal that had failed.
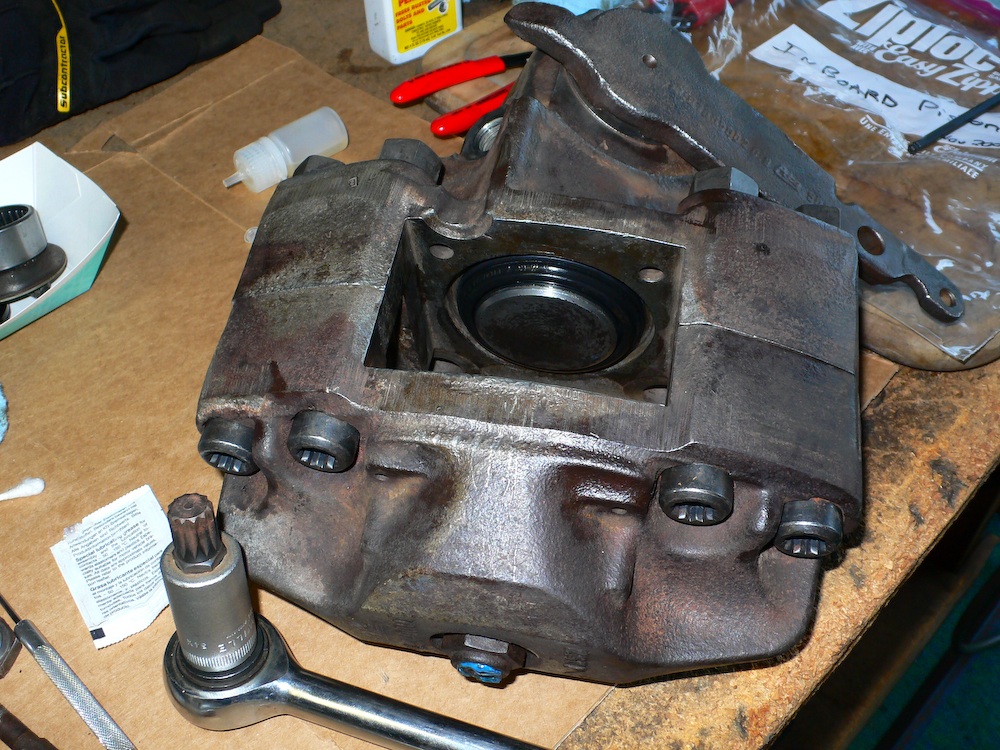
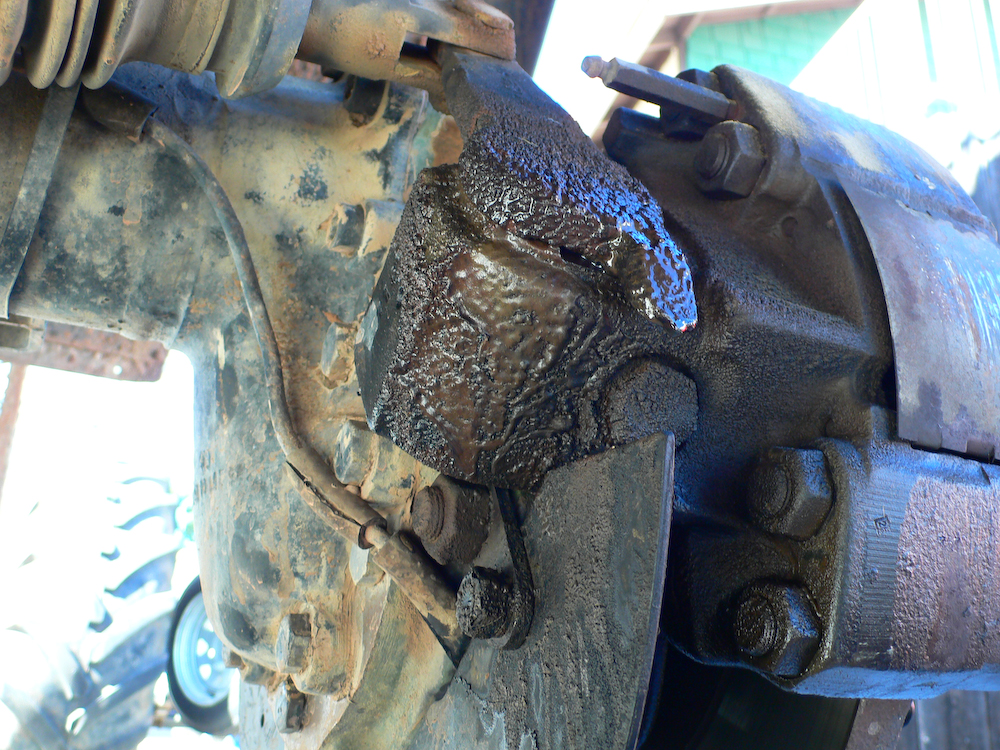
The completed repair action. Note the special tool required to separated and reassembly the halves of the caliper. This tool is called a "triple-square" bit and is NOT a torx. To the best of my knowledge, no other tool will work; I purchased the tool on the internet. But like most things on the internet, knowing what to call it is half the battle. If you need to separate the halves of the caliper you will need this tool. And, you will need to have a torque wrench of sufficient capacity to get the halves put back together. These bolts stretch and are NOT reusable. You can get them, and the required rubber seal, from your favorite mog parts dealer.
There is a parking brake adjustment action that
must be performed when you change the brake pads.
Consult the shop manual for the specifications, but the
essence is that the adjustment must be "backed out" when
installing new pads. Otherwise, you will not be able to
insert the rotor between the new pads. The slack in the
adjustment must be greater than 0 and less than the dynamic
range of the parking brake cam assembly.
Front Brakes
Except for the rear calipers, the mog brakes are quite simple. The caliper assembly consists of:
- The caliper itself (in two halves)
- The bolts that hold the caliper halves together (that
require the triple square bit of the correct size)
- 2 pistons (one in each caliper half) consisting of the piston itself, a piston seal (which is rubber), a dust boot (also rubber)
- 2 brake pads
- 2 anti-squeal pads
- 2 pins that hold the brake pads in
- Brake pad retaining spring
- Contamination shield
- A regular mounting bolt
- A body bolt (which will look very similar to the regular bolt but is a bit thicker and produces an interference fit).
- The bleeder port.
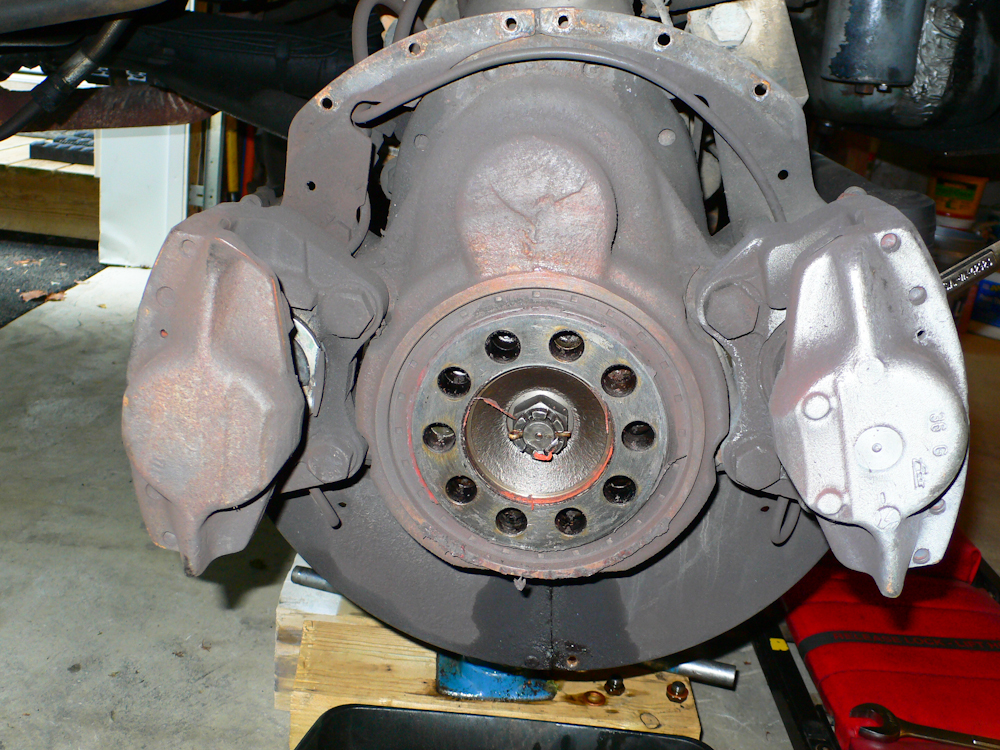
Front axle with rotor removed showing dual caliber
configuration. The caliper on the right is a new ATE
replacement for the original one. Also note the oil
leak at the bottom; this hub has failed.
On either front or rear, pads can be replaced without the requirement to remove the rotor. For any more extensive actions, the rotor will have to come off. To make the repairs easier, it is likely that the whole caliper assembly has to come off the hub. To remove that assembly, remove the rotor then remove the brake line (catching the fluid that will drip out). Then, remove the two bolts that hold the caliper assembly. Both bolts will be tight and one will likely be much harder to remove than the other. The hard one is the body bolt. YOU MUST NOTE THE POSITION OF THIS BOLT AS IT HAS TO BE RETURNED TO THE SAME HOLE UPON REASSEMBLY. The body bolt prevents the assembly from slipping around. Once you have these bolts loose you can tap them out with a mallet and punch if required. Be mindful of the weight of the caliper assembly so it does not fall on your foot.
If you have to separate the halves of the caliper, the easiest way is to leave it on the hub when you loosen the triple-square bolts. This allows use of the axle as your "vice" to hold it. It is possible to service the caliper halves with one half still attached to the hub.
To get the pistons out, put on safety glasses and a face shield and stick an air gun nozzle into the brake inlet port and energize. This will use the air pressure to push the piston out to be able to service it. Once the piston is out, you can then replace the rubber piston seal and inspect the bore of the cylinder for rust pits. A cylinder with rust pits can be refurbished if required. You will need a cylinder hone and some JB Weld. The process is first to hone the cylinder and see if the pits still remain. If they do, then using brake cleaner or acetone, clean the inside of the cylinder to insure that there are no chemical contaminants there. Mix some JB and using a gloved finger or a Q-Tip spread the JB over the pits. It is good to be liberal on this, the hone will take away the excess once it is hard. When the pits have been covered, go have a beer or 6. JB requires a full 15 hours to set and 24 hours is a better bet. When it is fully set, use the cylinder hone to remove the excess. The JB will fill the pits and produce a smooth bore. If the pits are on the piston, you can repeat the same process, but use 400+ grit sand paper to remove the excess JB. Both Kai and I have used this technique successfully over the years to extend the life of an otherwise scrap caliper or piston. If required, the whole assembly can be ordered as an ATE aftermarket item. Your favorite parts vendor can get these for you; my last recollection was that they were about $300 a caliper (this is the whole thing, no pads) so rather than take days to refurbish the old caliper, you may want to consider replacement as an option.
ATE is a good vendor for brake stuff and the quality and
prices are good and much cheaper than the Mercedes branded
parts. In some cases, Mercedes purchases from ATE and
puts it in their own box (with a hefty price increase).
Quick Links:
Zen
and Art Home Disclaimer
Errata Parts and Parts
Vendors
Truck Sales Service
and Repairs
Engine Fuel Hydraulics Radiator and Cooling
Air System Brakes Wheels Tires Electrical
and Batteries